Table of Contents
- Preface
- My requirements
- The foundations
- TLS, Cert Manager, and Infomaniak DNS
- Always-on Services on My Cluster
- Services Running at Home (Storage-Heavy & Cost-Sensitive)
- Backups with k8up
- Monitoring and Alerts
Preface
This article details my journey in building and managing my personal infrastructure as a self-hoster and also as a software engineer. It will also be a pretty good source of documentation for myself in the future, functioning as a sort of “infrastructure as code” diary.
Let me first start off by throwing a lot of buzzwords at you about what I’ll be covering in this article:
| Technology | Description |
|---|---|
| Kubernetes | Container orchestration platform for automating deployment, scaling, and management of containerized applications. |
| Helm | Package manager for Kubernetes, allowing you to define, install, and upgrade even the most complex Kubernetes applications. |
| Terraform | Infrastructure as code tool for building, changing, and versioning infrastructure safely and efficiently. |
| FluxCD | GitOps tool for Kubernetes that keeps your cluster in sync with your Git repository. |
| DroneCI | Continuous integration and delivery platform that automates the testing and deployment of applications. |
| Docker | Platform for developing, shipping, and running applications in containers. |
| Traefik | Modern HTTP reverse proxy and load balancer that makes deploying microservices easy. |
| Cert-Manager | Kubernetes add-on to automate the management and issuance of TLS certificates. |
| Gateway API | Kubernetes API for defining and managing service gateways. |
| Envoy | High-performance proxy for cloud-native applications, designed for microservices and service mesh architectures. |
| k8up | Kubernetes backup tool that provides easy and reliable backups for your cluster. |
| OpenStack | Open-source platform for cloud computing, providing infrastructure as a service (IaaS). |
| Infomaniak | Swiss cloud provider offering various hosting and managed services. |
| Swiss Backup | Backup solution tailored for the Swiss market, focusing on data privacy and security. |
| Vaultwarden | Self-hosted password manager that helps you manage your passwords securely. |
| Tailscale | Zero-config VPN that gives you secure access to your devices and services. |
| Stalwart | Modern, high-performance, all-in-one mail server solution. |
Also a quick disclaimer: I am by no means a reference of any kind. I am learning as I go, and this article is a reflection of my current understanding and experience with these tools. If you spot any mistakes or have suggestions for improvement, please feel free to reach out!
(Though hopefully the security standpoint is solid, I do not want to be responsible for anyone’s data getting compromised.)
I have been self-hosting various services for a few years now, I started somewhere around 2018 to self-host a Discord bot on a small VPS over at Scaleway (using Webmin for management). Over the years, I have experimented with various setups and technologies, but I always felt that there was room for improvement. (And I still feel that way!)
This article will cover my current setup as of September 2025, and will probably not be updated in the future as I continue evolving my infrastructure.
I will try to keep the article ordered and structured, but please bear with me if it gets a bit messy at times.
My requirements
When I set out to build my infrastructure, I had a few key requirements in mind, mainly about what I wanted to self-host :
- Mail server : I wanted to have my own mail server to have full control over my email and avoid relying on third-party providers. I also wanted to use a modern mail server solution that is easy to set up and maintain. And of course I want this data to be at home.
- *Arr services : I wanted to have a media server to manage and stream my media collection. I also wanted to have a download manager to handle my downloads efficiently.
- Password manager : I wanted to have a self-hosted password manager to securely store and manage my passwords.
The foundations
Kubernetes (and GitOps)
I chose Kubernetes as the foundation of my infrastructure for several reasons:
- I can have my infrastructure as code, which means that I can version control my infrastructure and easily reproduce it (and it acts as a free backup of my setup)
- It allows for easy scaling and management of applications
- It probably looks cool (at least that’s what I tell myself)
I use FluxCD as my GitOps tool to manage my Kubernetes cluster. This means that I can define my entire infrastructure in a Git repository, and FluxCD will ensure that my cluster is always in sync with the repository. This allows for easy updates and rollbacks, as well as a clear history of changes. (Even though I do enjoy force pushing my main branch sometimes…)
Infomaniak Managed Kubernetes Service
Since I don’t want to manage the complex part of the underlying infrastructure of my Kubernetes cluster, I opted for a managed Kubernetes service. After evaluating several options, I decided to go with Infomaniak’s managed Kubernetes service.
I chose Infomaniak as my cloud provider for several reasons:
- I work there so obviously I’m biased (and I also work on the specific team that manages the Kubernetes service)
- They are a Swiss company, which means that my data is stored in Switzerland and is subject to Swiss data protection laws
- Even though the service is managed, you still have some flexibility and control over your cluster
- The people behind it are pretty cool 😎
The managed Kubernetes service is built on top of OpenStack, which is an open-source platform for cloud computing. The OpenStack project (which your cluster runs on) is accessible from the user, which means that you can use it to create and manage your own virtual machines, networks, and storage next to your Kubernetes cluster (which is pretty neat).
With the default setup, this is what you get:
- CSI (Storage): OpenStack Cinder for block storage
- CNI (Network): Cilium
- Load Balancer: OpenStack Octavia (through CCM)
Terraform
To bootstrap my Kubernetes cluster and manage the OpenStack resources, I use Terraform. As luck would have it, Infomaniak provides a Terraform provider (which I also maintain) that allows you to manage Managed Kubernetes clusters.
Popping up a new cluster is as simple as : terraform apply with a few lines of configuration:
terraform {
  required_providers {
    infomaniak = {
      source = "Infomaniak/infomaniak"
      version = "1.1.7"
    }
  }
}

resource "infomaniak_kaas" "kluster" {
  public_cloud_id         = 1
  public_cloud_project_id = 1

  name               = "my-cluster"
  pack_name          = "shared"
  kubernetes_version = "1.33"
  region             = "dc4-a"
}
This way, I can also have this part of my infrastructure easily replicable without having to go through the UI, alhough my Terraform configuration is missing some pieces for true replicability.
OpenStack Proxy
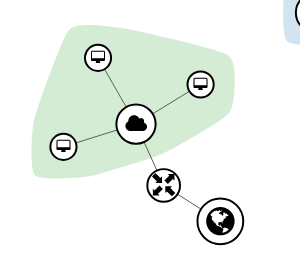
Since I want to have a worker node at home, to make my specific setup work, I also added a proxy instance with minimal specs (a1-ram2-disk20) in the sub network where all my instances live.
This instance is setup with Tailscale, Tailscale SSH and a subrouter for the OpenStack subnetwork, that way I can access the subnetwork from my Tailscale network, and it is also setup with NAT rules to proxy packets.
This is what the network looks like:
To setup the NAT rules, I used the following nftables configuration file:
table ip nat {
    chain prerouting {
        type nat hook prerouting priority dstnat; policy accept;

        ip saddr 172.21.0.0/16 ip daddr 172.21.3.34 dnat to 100.85.172.34
    }

    chain postrouting {
        type nat hook postrouting priority srcnat; policy accept;

        ip daddr 100.85.172.34/32 masquerade
        ip daddr 172.21.0.0/16 masquerade
    }
}
Understanding this table is fairly easy :
- Incoming packets from 172.21.x.x going to 172.21.3.34 are redirected to 100.85.172.34.
- Any packets leaving this NAT box towards 100.85.172.34 or the 172.21.x.x network will have their source IP replaced (masqueraded) with the router’s IP.
- This setup allows hosts in the 172.21.0.0/16 network to transparently reach 100.85.172.34 when they think they’re talking to 172.21.3.34.
This allows my worker node to work seamlessly with the rest of the cluster, as if it was running in the same environment. (pod to pod communication works, svcs are reachable, etc.)
This also allows me to use the OpenStack Load Balancer to expose services running on my home worker node to the internet, which is pretty neat and also an unintended side-effect.
I haven’t gotten around to playing with multiple worker nodes through this proxy, but I imagine it could work just as well. The natting rules might need to be adapted a bit, but the concept should remain the same (and also touching these rules can be a bit scary, so I haven’t dared to try it yet…)
Gateway
For ingress, I use the Gateway API, which is a more modern and flexible way to manage ingress in Kubernetes. It allows for more advanced routing and load balancing capabilities compared to the traditional Ingress resource.
My Gateway API provider is Envoy Gateway, which is a high-performance proxy for cloud-native applications. It is designed to be used in microservices and service mesh architectures, and it integrates well with Kubernetes.
I configured it to use OpenStack’s Load Balancer with Proxy Protocol enabled and I also made sure to enable the keep-floatingip option on the Load Balancer, that way I can keep the same IP address even if I delete and recreate the Load Balancer (which can happen when you delete and recreate a Gateway resource or other stuff).
You can configure it like this:
apiVersion: gateway.envoyproxy.io/v1alpha1
kind: EnvoyProxy
metadata:
  name: main-config
  namespace: envoy-system
spec:
  mergeGateways: true
  provider:
    type: Kubernetes
    kubernetes:
      envoyService:
        annotations:
          loadbalancer.openstack.org/proxy-protocol: "true"
          loadbalancer.openstack.org/keep-floatingip: "true"
        externalTrafficPolicy: Cluster
I also use it with the mergeGateways option enabled, that way I can have multiple Gateway resources that will be merged into a single Envoy configuration. I don’t really use this feature yet, but I imagine it could be useful in the future.
PS: The full configuration is available in my repository here.
Tailscale
To connect my infrastructure securely across different environments (cloud and home), I use Tailscale, a zero-config VPN built on WireGuard. Instead of running Tailscale manually on each node, I leverage the Tailscale Operator for Kubernetes.
The Tailscale Operator makes it easy to connect Kubernetes pods and services directly to my Tailscale network. It automatically manages authentication, key rotation, and network configuration, so I don’t have to worry about manual setup or maintaining sidecar containers.
With the operator, I can expose Kubernetes Services as Tailscale nodes using the tailscale ingress feature. This allows me to access services running in my Kubernetes cluster from any device on my Tailscale network, without needing to expose them to the public internet. Here’s an example of how I expose a service via Tailscale using the operator:
apiVersion: networking.k8s.io/v1
kind: Ingress
metadata:
  name: pgadmin
spec:
  ingressClassName: tailscale
  rules:
    - http:
        paths:
          - path: /
            pathType: Prefix
            backend:
              service:
                name: pgadmin
                port:
                  number: 8080
The node will be accessible at <namespace>-<ingress-name>-ingress.<tailnet>.ts.net, in my case postgresql-pgadmin-ingress.tail5ec535.ts.net.
Here’s a basic example of how I expose a service via Tailscale using the operator:
apiVersion: v1
kind: Service
metadata:
  annotations:
    tailscale.com/tailnet-fqdn: home1.tail5ec535.ts.net
  name: home1
  namespace: tailscale
spec:
  externalName: placeholder   # any value - will be overwritten by operator
  type: ExternalName
The operator will automatically assign a Tailscale IP and DNS name to the service, making it reachable from any device on my Tailscale network. This approach greatly simplifies secure networking between my home and cloud resources, and reduces the need for complex VPN or firewall setups.
For more advanced use cases, the operator supports features like ACLs, subnet routing, and sharing access with other Tailscale users or devices. Overall, it has made my hybrid infrastructure much easier to manage and more secure.
It’s also worth mentioning that Tailscale provides its own automatic TLS for any service exposed via its ingress. When you use the Tailscale Operator to expose a service, Tailscale automatically provisions and manages certificates for the generated ts.net domain. This means that all services accessible through Tailscale ingress are always served over HTTPS, with valid certificates, out of the box, no extra configuration required. This is a huge convenience for internal and hybrid services, as you get end-to-end encryption and trusted certificates without any manual certificate management.
Keda
And finally, to handle scale to zero, I use Keda (Kubernetes Event-Driven Autoscaling). Keda is a Kubernetes-based event-driven autoscaler that allows you to scale your applications based on external events, such as messages in a queue or CPU usage.
My primary use case is via the HTTP Add-on, which allows me to scale deployments based on the number of incoming HTTP requests. It has a proxy to which you can route your traffic, and it will scale the deployment up if it’s needed, and scale it back down to zero when there are no requests (after a bit).
I also contributed to the addon by adding support for a fallback target, which allows you to route to a different target if the primary one is not available. This is useful for scenarios where you want to have a default response when your application is scaled down to zero. A good example is this blog, which is served by a booting-up instance.
My fallback can be found here, it’s simply a caddy instance with its page served from a configmap (yes, I know, but it works).
TLS, Cert Manager, and Infomaniak DNS
Securing my services with TLS is a must, especially when dealing with sensitive data or authentication. Automating certificate management is even more important when you have multiple domains and subdomains, and that’s where Cert Manager comes in.
Cert Manager
Cert Manager is a Kubernetes add-on that automates the management and issuance of TLS certificates from various sources, including Let’s Encrypt. It handles certificate requests, renewals, and even failure recovery, so I don’t have to worry about expiring certificates or manual intervention.
In my setup, Cert Manager is deployed as a set of controllers in the cluster. I mostly use the ACME DNS-01 challenge mechanisms. This allowed me to get certificates even when my domain was not pointed to my infra (when I swapped from my old infra to my current infra). For most public-facing services, HTTP-01 is enough, but for wildcard certificates or internal domains, DNS-01 is required.
ACME Protocol
Little subsection about the ACME protocol and challenges.
When you want a TLS Certificate (and not pay an egregious amount of money), you’ll most likely turn yourself to Let’s Encrypt. This protocol was made by the ISRG specifically for Let’s Encrypt.
Long story short, when you want a certificate, you need to prove to them that the domain is yours. They use what’s called “challenges” to do so, a challenge can have multiple forms :
- HTTP-01 : Upload a file to your server and they’ll check that it’s the correct one, it proves that you control the server that the domain currently points to
- DNS-01 : Add a TXT to your DNS to prove that you control the zone
- TLS-01 : do ppl really use it ?
For my use case (DNS-01), Cert Manager requires a dns-01 provider (to setup the challenges), thus we will need to configure one.
Infomaniak DNS
Since all my domains are managed through Infomaniak. And since they already have a webhook provider: cert-manager-webhook-infomaniak. It was quite easy to setup like so (with Flux) :
---
apiVersion: source.toolkit.fluxcd.io/v1
kind: GitRepository
metadata:
  name: infomaniak-webhook
spec:
  interval: 5m
  url: https://github.com/Infomaniak/cert-manager-webhook-infomaniak
  ref:
    branch: master
  ignore: |
    /*
    !/deploy/
---
apiVersion: helm.toolkit.fluxcd.io/v2
kind: HelmRelease
metadata:
  name: infomaniak-webhook
spec:
  interval: 5m
  chart:
    spec:
      chart: deploy/infomaniak-webhook
      sourceRef:
        kind: GitRepository
        name: infomaniak-webhook
  values:
    groupName: acme.infomaniak.com
    secretsNames:
      - infomaniak-api-credentials
This allows Cert Manager to fill out DNS challenges on domains that are registered by Infomaniak.
Here’s a simplified example of how I configure a ClusterIssuer for DNS-01 with Infomaniak:
apiVersion: cert-manager.io/v1
kind: ClusterIssuer
metadata:
  name: letsencrypt-infomaniak
spec:
  acme:
    server: https://acme-v02.api.letsencrypt.org/directory
    email: me@example.com
    privateKeySecretRef:
      name: letsencrypt-infomaniak
    solvers:
      - dns01:
        webhook:
          groupName: acme.infomaniak.com
          solverName: infomaniak
          config:
            apiTokenSecretRef:
              name: infomaniak-api-credentials
              key: api-token
With this setup, requesting a certificate for any domain managed by Infomaniak is fully automated. Cert Manager creates the necessary DNS challenge records, waits for propagation, and finalizes the certificate issuance. Renewals are handled in the same way, so I never have to think about it again.
Putting it all together
With Cert Manager and Infomaniak DNS integration, all my services exposed via Gateway API can have valid, automatically managed TLS certificates. This greatly improves the security and reliability of my infrastructure, and lets me focus on building and running services instead of worrying about certificates.
Always-on Services on My Cluster
Not all my services run at home, some are “always-on” and live in my Infomaniak Kubernetes cluster for reliability, uptime, and public accessibility. Here’s a quick overview of the main services I keep running 24/7 in the cluster (not at home):
-
This Portfolio: The very site you’re reading! It’s deployed as a static site, served via the Gateway API, and benefits from all the automation and security described above.
-
CyberChef: A self-hosted instance of the popular web app for encryption, encoding, compression, and data analysis. It’s a handy Swiss Army knife for all sorts of data manipulation tasks.
-
PostgreSQL & pgAdmin (via Tailscale): My main database runs in the cluster, and I use pgAdmin for management. Both are exposed only via Tailscale ingress, so they’re never open to the public internet, only accessible from my private Tailscale network.
-
Capsule: A lightweight, multi-tenant, Kubernetes-native application platform. I use Capsule to help manage multi-tenancy and resource isolation for different projects and environments within my cluster.
-
DroneCI: My continuous integration and delivery platform. DroneCI automates builds, tests, and deployments for my projects, integrating tightly with my Git repositories.
-
Pterodactyl: A game server management panel. I use it to spin up and manage game servers for myself and friends. The panel is on the cluster, while the actual game servers run on other servers via Docker. It would also be possible for me to give the docker access to the worker pod at home, but that’s a bit too cursed (even for me).
-
Stirling PDF: A self-hosted PDF toolkit for converting, merging, splitting, and manipulating PDF files. It’s surprisingly useful for both personal and work-related document tasks.
-
Vaultwarden: My self-hosted password manager, running securely in the cluster. It’s always available, with automated backups and TLS.
-
Weave GitOps: A dashboard and management tool for GitOps workflows. It gives me visibility into my FluxCD-managed resources and helps with troubleshooting and rollbacks.
All of these services benefit from the cluster’s high availability, automated certificate management, and secure networking. By keeping them in the cloud, I ensure they’re always accessible and resilient, while more sensitive or resource-intensive workloads can run at home as needed.
Services Running at Home (Storage-Heavy & Cost-Sensitive)
While my cluster handles the “always-on” and critical services, I also run a set of services at home, mainly those that are storage-intensive or where I want to avoid cloud storage costs. Here’s what I keep on my home infrastructure:
-
The *Arr Stack: This includes Radarr, Sonarr, Lidarr, and other media management tools. These services handle my media library, downloads, and automation. They require a lot of disk space, so it makes sense to keep them on local storage where I have more control and no recurring cloud storage fees.
-
MariaDB: A lightweight database instance for a few personal apps and experiments. It doesn’t store much data, but it’s convenient to have a local database for quick projects or testing. It also serves as a database for pterodactyl but it’s fiiiineee.
¯\_(ツ)_/¯ -
Image Registry Mirror: I run a local container image registry mirror to speed up pulls and reduce bandwidth usage. It also pushes images to GitHub as a backup and for remote access, but the bulk of the storage is local.
-
Stalwart: My mail server solution. Running it at home gives me full control over my email and data privacy, and avoids the cost and complexity of cloud-based mail hosting.
-
Immich: A self-hosted photo and video album solution. Immich stores my personal photo library, which can quickly grow in size. Keeping it at home means I can scale storage as needed without worrying about cloud costs or upload limits.
For all these services, local storage is key. I can use large, inexpensive disks and scale up as my needs grow, without worrying about cloud provider fees. Tailscale and my hybrid Kubernetes setup make it easy to securely access these services from anywhere, while keeping my data close and costs low.
Backups with k8up
To protect my data, I use k8up as my Kubernetes-native backup solution. k8up handles both application-level backups (by running custom commands inside containers) and persistent volume backups (PVC snapshots), making it flexible for a variety of workloads.
For extra safety, I push my backups to a remote server using a push-only proxy. This means the backup destination is not directly accessible from my cluster, protecting my backups from accidental or malicious deletions, even if my main cluster is compromised, the backups remain safe on the remote server.
k8up’s support for both command-based and PVC backups lets me cover everything from databases to file storage, ensuring I can restore critical data or entire applications if needed. This setup gives me peace of mind that my infrastructure and data are resilient against loss or disaster.
The schedule looks something like this:
apiVersion: k8up.io/v1
kind: Schedule
metadata:
  name: schedule
spec:
  backend:
    rest:
      url: http://dk1.tailscale.svc:8000
      userSecretRef:
        name: backup-secret
        key: username
      passwordSecretReg:
        name: backup-secret
        key: password
    repoPasswordSecretRef:
      name: backup-secret
      key: repoPassword
  backup:
    schedule: '@daily-random'
    failedJobsHistoryLimit: 1
    successfulJobsHistoryLimit: 1
  check:
    schedule: '@daily-random'
  prune:
    schedule: '@daily-random'
    retention:
      keepLast: 5
      keepDaily: 1
The schedule time is randomized a bit to avoid all my backups happening at the same time, which could overload the system. I keep a few successful and failed jobs for history, and I prune old backups to save space.
Hosting External Services for Friends
One of the cool things about running my own Kubernetes cluster is that I can safely host small services for friends and family. For example, I run an instance of Uptime Kuma for a friend—because, let’s be honest, self-hosting your uptime monitor on the same server that might crash kinda defeats the whole purpose of the thing..
To keep things secure and organized, I use separate Kubernetes namespaces and apply strict network policies. This means each friend’s service is isolated from my own infrastructure, minimizing risks and ensuring privacy. If something goes wrong with one service, it won’t affect the rest of my cluster.
This setup allows me to offer reliable hosting for small apps, monitoring tools, or other utilities, without compromising my own services. It’s a great way to share resources and help others, while still maintaining strong boundaries and security.
Monitoring and Alerts
To keep an eye on everything, I deploy the kube-prom-stack (Prometheus, Alertmanager, and Grafana) in my cluster. This stack collects metrics, visualizes them, and sends alerts when something goes wrong.
For notifications, I use Alertmanager’s Discord integration. This way I get real-time alerts directly in my Discord server, making it easy to see issues. I don’t really mind not resolving them, but at least I’m aware of them.
PS: By the time you read this, (starting from the beginning of this article), the Portfolio Pod should have been scaled to zero :D